

Let’s imagine a situation where you urgently need to get from point A to point B, but your car won’t start. The question immediately arises in your head – why does the car not start? Today we will talk about the reasons why this can happen, and what role the starter plays in this matter. If you are not in a hurry and do not have experience in repairing a starter, then you should definitely contact a car service specialist. But we have a situation where everything is in our hands. We want to understand the reasons why the car does not start, find ways to repair the starter and repair the starter with our own hands.
To begin with, let’s figure out what function the starter performs and why it affects the engine start. It turns out that before its failure, various precursors of a malfunction appear. Therefore, pay attention to how the operation of the car is changing, what nuances, characteristic symptoms, sounds appear. Thus, you will be able to control the normal technical condition of the vehicle and plan its repair. After all, even the most reliable car models break down sometimes – nothing lasts forever.
The main function of the starter is to start the engine, so if the starter begins to break, it is very difficult to start the car. If you could not determine the malfunction by visible symptoms, you should diagnose the starter using available tools or a multimeter.
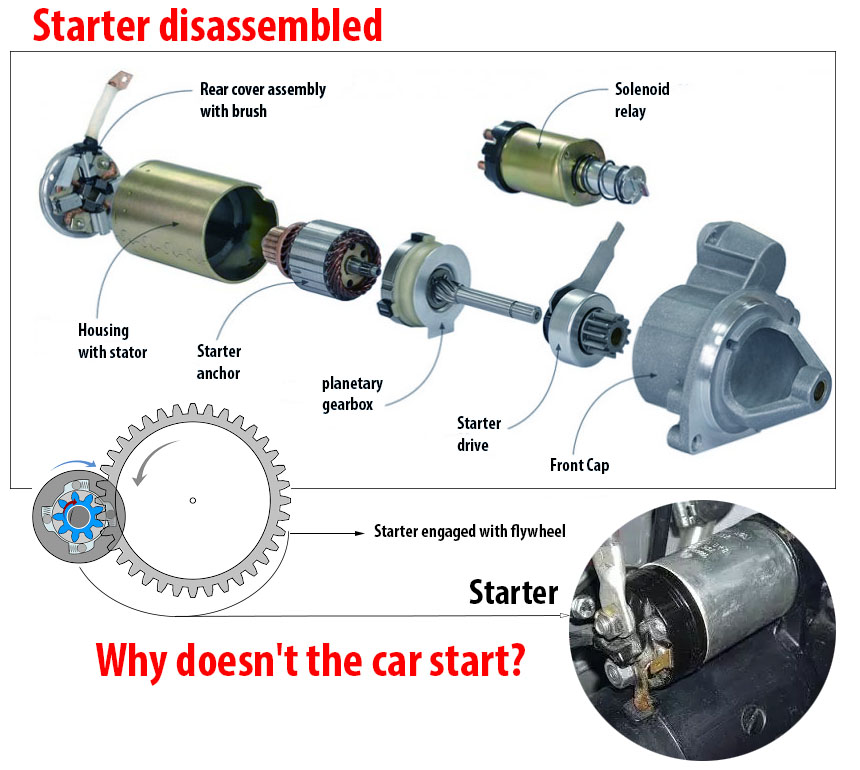
Step #1. Checking the starter solenoid relay. To do this, you only need a charged battery device and two power wires. And to check such starter elements as an anchor, brush, and starter windings, you will need to disassemble everything and ring using a multitester.

Step #2. Checking the starter with a battery device
Close the negative terminal to the starter frame, and the positive terminal to the upper terminal of the relay and its connection contact. If the bendix is removed and the gear motor starts spinning, then the starter is functioning.
Next, you need to check all the components of the engine start equipment.
Step #3. Checking the solenoid relay

To check the retractor starter relay, connect the battery terminal to the positive on the relay, and to the minus on the starter frame. The bendix gear should move forward.
If the bendix gear does not extend, then the contacts of the retraction element are burnt, the armature is jammed, or the starter windings or relays are burned out.
How to check starter brushes
To check the brush, connect one terminal of a 12-volt lamp to the brush holder, and the second to the frame, if it lights up, then the brushes need to be changed, as there are holes in the protective element.

We check the short circuits of the starter brushes to ground. This is done on a dismantled starter. Measure the resistance of the main plate and brush holder with an ohmmeter. The resistance must be in the direction of infinity.
When disassembling the starter elements, inspect them for damage, distortion, breakage.
Bendix checking
To check the bendix, clamp the clutch frame in a vise and try to scroll it. No rotation is allowed. If he turned in any direction, then a breakdown in the overtaking clutch.
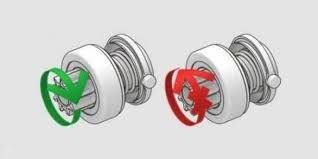
Inspect the bendix for damage to the teeth. In this case, the bendix will not be able to engage with the flywheel and the device will spin in vain.
Checking the starter winding
We check the starter winding with a 100V lamp or a flaw detector. Consistently connect one wire to the frame, and the second to the winding terminal. If the light comes on, then there is a breakdown.
Checking the starter anchor
Use a 12V battery to test the armature. Apply voltage to the starter past the relay. If it does not spin, there is a problem with it or with the brushes.

Checking the starter with a multimeter is to measure the resistance current between:
- brushes and plate;
- winding and housing;
- collector plates and armature core;
- starter housing and stator winding;
- ignition off contact and a constant plus. Should be 1-1.5 ohms;
- the ignition connection terminal and the traction relay housing (the holding winding of the solenoid relay is checked). Should be 2-2.5 ohms.
Conduction is not allowed between the housing and the winding, the rotor shaft and the commutator, the ignition contact and the positive contact of the relay, as well as between the two windings.